This is an automatically translated article.
The article was written by Dr. BS Vu Hoang Huy - Emergency Doctor - Emergency Department - Vinmec Times City International General Hospital.An intraosseous (IO) line is an infusion that is established into cancellous bone with an intraosseous needle in emergencies of cardiopulmonary arrest or other life-threatening emergencies where intravenous approaches ( have difficulty) cannot be achieved quickly.
1. Concepts
Infusion of bone is a technique made possible by the presence of veins in the bone, which helps to circulate the blood in the medullary sinuses of cancellous bone with the circulatory system.Presence of venous sinus systems and cancellous bone that do not collapse during hypovolemia and hypovolemic shock.
1.1. Significance The option of peripheral vein placement is usually tried first if peripheral veins are visible or palpable, but in life-threatening emergencies and circulatory arrest, successful establishment of a large line cannot be achieved. must be easy and highly successful.
Intra-osseous infusion is a technique that can be performed quickly, without interrupting other emergencies as well as ensuring a good infusion line to resuscitate fluids and drugs as well as a large vein.
Since 1922 this technique has been described and applied, today it is proven effective when applied in pediatric and adult patients. Especially in severe dehydration, hypovolemic shock and circulatory arrest situations as well as out-of-hospital emergencies.
Possible complications of intra-osteal infusion: Intra-osteal infusion is quite safe, the complication rate is <1%. Potential complications include:
Fractures : Often due to large needles, rough manipulation (often due to manual approach to bone), placement of an intraosseous line in patients with osteoporosis (NB) . Cavity compression: due to improper placement. Fat embolism. Osteomyelitis and subcutaneous abscesses: due to manipulations involving unsatisfactory sterility. 1.2. The role of the bone infusion The intraosseous line can be used to infuse most drugs as usual intravenously. Examples are: Epinephrine, dopamine, dobutamine, adenosine, digitalis, heparin, lidocaine, atropin, sodium bicarbonate, phenytoin, neuromuscular blocking agents, antibiotics, crystals, colloids and blood products... Speed The intra-osseous infusion rate is equivalent to the rate of intravenous 21G needle infusion, the maximum can reach about 165ml/min at the tibial intra-tibia and 153ml/min at the transhumeral line. Several studies have demonstrated similar efficacy to central intravenous administration. A bone marrow blood sample for diagnostic testing includes glucose, hemoglobin, pH, pCO2, serum bicarbonate, sodium, blood urea nitrogen chloride, creatinine, serum drug levels, and cultures (eg, bacterial cultures, viral or fungal), blood type ABO and Rh blood has the same value as venous blood. Bone marrow blood samples can be substituted in cases where a standard blood sample cannot be obtained.

2. Indications and contraindications of intra-osseous infusion technique:
2.2. Indications for Intra-Skeletal Indication Performed in neonates and children in the presence of circulatory arrest or in severe shock when an intravenous line is not readily established. Preferably choose the bone line over the central vein. Indicated for adults in cardiac arrest or severe shock when peripheral venous catheterization is not possible. Recommend placement of an osseous line pending central venous access. Indications for placement of a bone line for cardiac arrest or shock or out-of-hospital emergencies. Indicated for critically ill patients requiring rapid establishment of peripheral access: Shock, sepsis, epilepsy, extensive burns, multiple trauma, or in patients requiring resuscitation or unable to select an alternative route despite trying many times. 2.2. Contraindications There are relatively few absolute contraindications to intravenous (IO) infusion because the technique is mainly indicated in life-threatening emergencies:Do not use broken or already broken bone. Place a bone line 48 hours before as fluid will escape through the fracture or perforation site. A limb with vascular disruption due to trauma or surgery, is not suitable for IO infusion because fluids or drugs injected into the bone marrow will leak through the vascular tear. The landmark could not be identified. Do not place in previous orthopedic surgery positions, positions with prosthetic bone-arthroplasty devices. Relative contraindication: Failure to place an intraosseous line in the previous location Patient has cellulitis, burns, or osteomyelitis associated with the infusion site. Patients with osteonecrosis or osteoporosis, who have increased bone brittleness. Failure to place the infusion in the bone to the position previously placed To reduce complications: Patients with coagulopathy, thrombocytopenia, bleeding are taking anticoagulants.
3. Selecting the placement of the infusion line in the bone
3.1. Bone Anatomy and Physiology An intraosseous infusion (IO) is possible because of the presence of intraosseous veins, which drain the medullary sinuses in the long bone marrow with the subsequent associated vein. return to the central vein.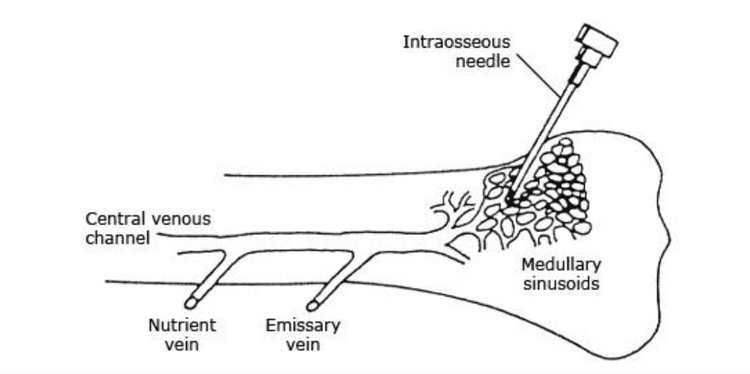
superior tibia- popliteal vein inferior tibial head- great saphenous vein inferior femoral head- oblique branch of the femoral vein Head on the humerus-axillary vein 3.2. How to determine the position of needle insertion into the bone Upper tibia: In children: the position of bone transmission is determined as the midpoint of the tibial plane about 1cm from the tibial tuberosity or about 1cm below the kneecap. lies on the plane of the tibia. In adults: the extensor leg is 3 cm below the patella or about 1-2 cm below the tibial tuberosity and about 2 cm from the tibial plane to the tibial tuberosity. Lower femoral head: Only applicable in children, located about 1-2cm above the patella and about 1-2cm from midline to medial line. Inferior tibial head: In adults: About 3cm above the medial medial head above the tibial tibial head In children: 1–2cm from the medial inferior medial head above the tibial plane. Upper humerus: Arm extended and forearm flexed and hand on abdomen. The identified location was the large tubercle of the humerus 2cm below the apex of the shoulder and about 2cm above the anatomical neck.
4. Technical steps of the EZ-IO . machine for intraosseous placement
4.1. EZ-IO drill tool preparation and needle selection 4.1.1. Prepare the bone drill: The kit includes a bone drill, a needle fixer, a set of wires that connect to the needle, and a set of needles.
Step 2: Identify the indications and contraindications
Step 3: Prepare the instrument:
Set the line EZ-IO's EZ-IO Intramuscular Infusion Gun Needle Gun Intra-articular Needle Connector Triangular Fixation Band 10ml Cylinder with screw thread, available 10ml physiological saline NaCl 0.9% NaCl Infusion Solution 0.9% Disinfectant Bag Apply pressure Anesthesia and instruments (if anesthesia is needed – as directed by the doctor) Step 4: Prepare the patient and determine the location of the infusion line: The patient's position depends on the condition and placement
Position tibia position: patient lies supine, legs extended. Position of head on humerus, lower end of tibia, lower end of femur: Patient lying on his back, upright position Step 5: Wear a mask, wear a hat, disinfect hands
Step 6: Disinfect the needle puncture site with gauze Betadine at least 2 times with a minimum diameter of 5cm
Step 7: Anesthetize with Lidocaine (if necessary)
Step 8: Check once again the operation of the needle gun and insert the needle in the appropriate bone
Step 9: Remove the needle safety cap
Step 10: The non-dominant hand tightens the skin and fixes the needle puncture position
Step 11: The dominant hand gently holds the gun to press the needle tip through the skin until it touches the bone
Step 12: Pull the trigger gun and press firmly until the hand feels loose or elastic
Step 13: Stop pulling the trigger, remove the needle gun in the bone by holding the needle bar and straightening the gun.
Step 14: Remove the inner needle by turning it counterclockwise, insert the needle into the attached safety device (Figure 7)
Step 15: Check the exact position of the needle by aspiration of bone marrow, If indicated, it can be taken as a test sample.
Step 16: Fix the needle with triangle tape (Figure 8)
Step 17: Attach the connecting wire and quickly pump (Flush) 10ml physiological saline 0.9% NaCl to create space in the bone marrow
Step 18: Connect with infusion system (according to BS orders)
Step 19: Check the fluid rate, infusion site and surrounding tissue for drainage or swelling.
If you have a need for consultation and examination at Vinmec Hospitals under the national health system, please book an appointment on the website (vinmec.com) for service.
Please dial HOTLINE for more information or register for an appointment HERE. Download MyVinmec app to make appointments faster and to manage your bookings easily.

