This is an automatically translated article.
The article was written by Master, Doctor Phan Ngoc Toan - Emergency Medicine Doctor - Emergency Department - Vinmec Danang International Hospital.First aid is the first aid and intervention of first responders with an accident, injury, or acute illness. First aid helps save the life of the victim, prevents the condition from worsening, thereby helping the victim to speed up the recovery process. First aid includes the principle that activities are arranged in a certain order and obligatory first-aiders must follow. However, not everyone understands that principle. The improper implementation of first aid steps, not only does not help the victim, on the contrary, also makes the victim worse.
Basic CPR is a lifesaving technique that is useful in many emergencies during an accident, when the victim's breathing or heart rate has stopped. This is a skill that is recommended that everyone, from untrained medical personnel to the general population, know how to perform CPR by chest compressions at the scene.
1. What is the DRSCAB Principle?
The DRSCAB principle is the principle of the order in which to give first aid to the victim, the principle includes:D - Danger: Detect danger of the scene to the rescuer, the victim and people around. R - Response: Check victim's cognitive response S - Send: Call for help C - Circulation - Circulation A - Airways: Check airway B - Breathing: Check and provide respiratory support In addition, can apply some additional support measures as follows:
D: Defibrillator: defibrillator, if available at the scene like in advanced countries (AED: automated external defibrillator) E : Expose: expose the victim to check for other injuries (properly open the helmet, remove the car seat belt, belt, tie if it affects the patient or the rescue process. ..)

2. Steps to perform first aid according to DRSABC principles
2.1. D- Danger- Site Assessment What you should do is assess whether:Are there any dangers to you when performing the first aid? Are there any dangers to the victim? Are there any dangers to people around? For example: Victim has an electrical accident, you must make sure the power is turned off, set a warning of dangerous power source to let everyone around know,..
Traffic accident victim, you need barriers must be placed to restrict traffic from entering the area where the victim is lying, and taking the victim to a safe area...
2.2. R- Reponse- Check the victim's reaction
For example: Ms. H, Mr. B,...
Note:
Do not tap places such as the victim's face, the victim's hand, to avoid bone damage. their name if known. 2.3. S- Send- Call for support

Call 911, turn on speakerphone mode to exchange information and receive continuous instructions while assisting the victim.
Get an AED if one is available, or send someone to call 911 and get the AED. In advanced countries, AEDs can be installed in public places such as trains, railway stations, airports, schools, supermarkets, etc. In Vietnam, AEDs are not yet available in public places, so accessing and obtaining AEDs is very difficult. Usually these machines are only equipped on ambulances or in hospitals. However, we still advocate training in advance for students to understand how to use the AED because it is an indispensable device in the emergency of circulatory arrest.
Provide information including: Cause How many victims are there at the scene? Condition of the victim Request to the caller: Clear, concise and accurate sentences
Full information:
Information on the scene: location, address, route... Information about the accident: type of accident, severity of accident Victim's information: number, gender, age, injuries, victim's condition... Information about hazards: toxic gas, explosives.. . Contact information: your name, phone number... Principle: Only order after 115 has hung up
2.4.C - Circulation - Circulation Evaluation of circulation is based on a peripheral pulse in the neck. arms, neck or groin area. If it is difficult or impossible to catch, the victim is in a state of severe shock, possibly about to go into cardiac arrest. Measures to stop bleeding such as dressing or applying pressure to the bleeding site with clean sterile clothing or gauze as possible, remain in place until medical personnel arrive. gauze being kept to replace new gauze will make the bleeding stronger and difficult to stop. In addition, it is necessary to raise the bleeding limb to the level of the heart and keep it the same, which will have the effect of causing blood to rush to the heart and brain. Only insert the garo if the limb has been amputated and is still bleeding. In case the victim has a cardiac arrest, it is necessary to conduct cardiopulmonary resuscitation with chest compressions (details below).
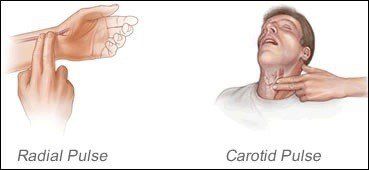
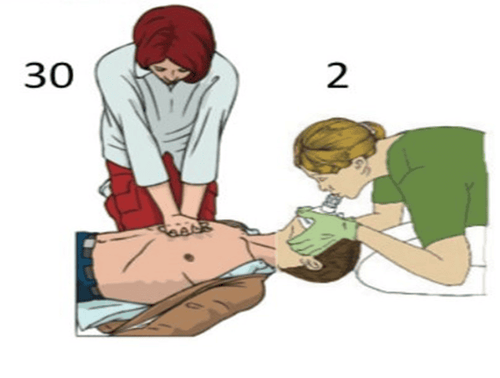
2.6. B- Breathing- Check for breathing Check for breathing: Place your ear near the victim's mouth and nose so you can and your eyes at the same time observe the victim's chest. Look at the movement of the chest up and down, listen and feel the victim's breathing, check the pulse and breathing should be done at the same time for about 5 - 10 seconds, start giving circulatory support. .
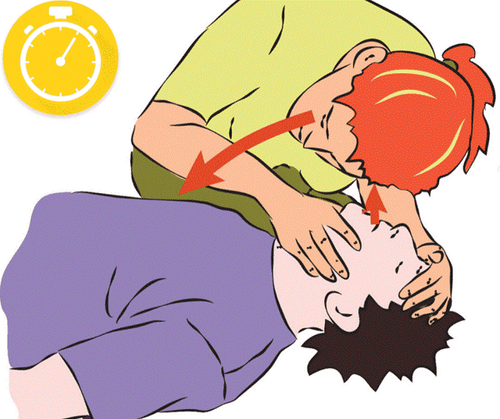
3. Coordinate emergency respiratory arrest

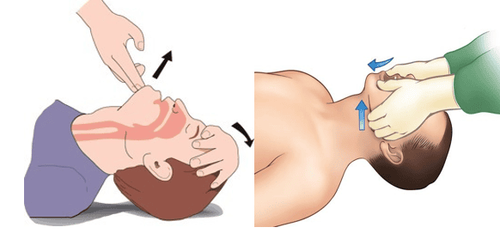
CPR Open airway CPR (Cardiopulmonary resuscitation): Cardiopulmonary resuscitation, extrathoracic compression, respiratory support
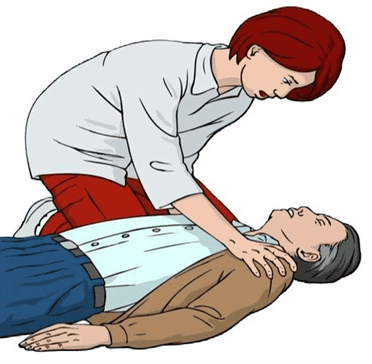
3.1. Perform chest compressions
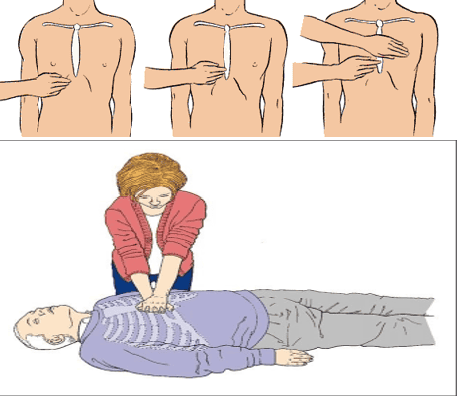
Kneel/stand across the victim's chest
Step 2 Determine the exact position of chest compressions at 1⁄2 below the sternum:
Use the middle finger to run along the victim's flank toward the sternum Place the index finger next to the finger center to ensure compression position 2 fingers from the sternal tip Step 3: Give chest compressions fast enough, strong enough 1 cycle of 30 chest compressions and 2 breaths Place the heel of the other hand above the back of the hand being placed on sternum interlaced fingers Extend 2 elbows perpendicular to the patient's chest wall and remain in this position throughout the chest compressions. Use your body weight to press down on the victim's chest to at least 5cm. Make sure to press straight down to the sternum. Count loudly during compressions: from 1 to 30 Compressions with a frequency of 100 - 120 times/minute. Do not take your hands off the sternum during chest compressions Note:
At the end of each compression, be sure to allow the chest to fully expand. Minimize the pause in chest compressions to no more than 10 seconds 3.2. Open the airways
3.3. Respiratory support (B: Breathing) Mouth breathing – mask with protective equipment in case of cardiopulmonary resuscitation outside the hospital

Stand/kneel across the victim's head
Place the mask on the victim's face, the pointed end of the mask against the bridge of the nose, the blunt end of the mask against the chin
Fix the mask against the victim's face:
Use the index finger and thumb of the hand close to the top of the victim's head to press against the edge of the mask. Place the thumb of the second hand on the edge of the bottom mask. Place the remaining fingers of the second hand under the victim's chin and lift the chin. Perform head tilt and chin lift to open airway
While lifting chin, press mask tightly against victim's face.
Blow in air slowly for 1 second to let the victim's chest inflate
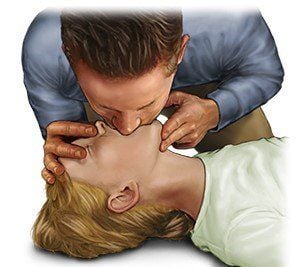
Direct mouth-to-mouth breathing technique
| Bước | Hành động trên người bệnh |
| 1 | Giữ cho đường thở mở với tư thế đầu phù hợp bằng kỹ thuật Ngửa đầu – Nâng cằm |
| 2 | Kẹp chặt cánh mũi với ngón cái và ngón trỏ, gan bàn tay tì lên trán nạn nhân. |
| 3 | Hít 1 hơi bình thường, trùm kín và chặt miệng người cứu hộ vào miệng nạn nhân. |
| 4 | Thổi vào trong 1 giây, chú ý quan sát lồng ngực phồng lên? |
| 5 | Nếu lồng ngực không phồng lên, lặp lại động tác ngửa đầu nâng cằm. |
| 6 | Lặp lại bước 4 |
| 7 | Nếu không thể thông khí sau 2 lần thử, lập tức trở lại ép tim |
Above are the basic theories of CPR for adults in the field. Successful application and improvement of victim mortality depends on many factors, from the cooperation of rescuers and medical forces as well as the proficiency of rescuers at the scene. We recommend that all residents immediately call for emergency medical assistance and practice best first aid skills (if trained).
Please dial HOTLINE for more information or register for an appointment HERE. Download MyVinmec app to make appointments faster and to manage your bookings easily.
Reference source: nhs.uk
